How to Get into Astrophotography.
Tips for Beginners
Introduction
The wide field of astrophotography can be divided into three areas where techniques and equipment are different. We will consider them separately in order of increasing difficulty. Nigthscape photography deals with shooting large areas of night sky, star fields, the Milky Way, and sometimes with elements of landscape like trees, mountains, buildings, etc. The aim of the planetary photography is to image the Moon, the planets, comets, and notable astronomical events in the Solar system like eclipses, transits and occultations. And deep space photography is taking photos of objects like galaxies, nebulae and star clusters which are beyond the Solar system.
Astrophotography considerably differs from daylight photography. But if you already have experience in photography, it will definitely help you to get into astrophotography faster.
Nightscape Photography
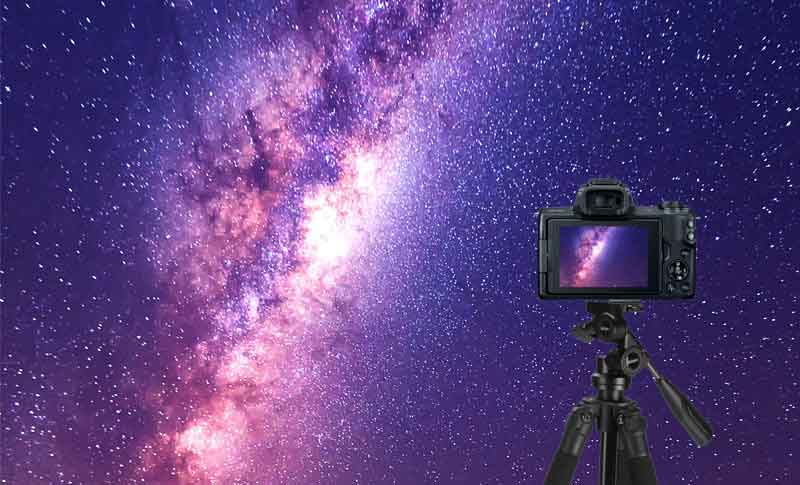
To start doing nightscape photography, you just need to have a camera and a tripod. You can also use a smartphone instead of a camera. Many modern smartphones are equipped with good cameras of high resolution and sensitivity, which makes them suitable for astrophotography, at least, at the entry level. The activity involves traveling to the place of interest, setting up a tripod and camera, and making photos in night conditions.
Objects of the night sky are dim, and we need to use long time exposure to capture them. The camera must remain still during the exposure, that is why it should be set up on a sturdy tripod to avoid small camera movements and vibrations causing blurry images.
However, if the camera position is fixed, the exposure can not be too large, if you want to shoot the stars as you see them with an unaided eye. The Earth rotates on its axis and as a result the stars move around the celestial sphere. There is a maximum exposure at which the movement of the stars is not yet visible in the image. This maximum exposure time is approximately 500 divided by the focal length in millimeters. For instance, if the objective focal length is 50 mm then the exposure should be equal or less than 10 seconds. As we see from this dependence, camera lenses with shorter focal length allow longer maximum exposure.
Fighting Light Pollution
A disturbance for astrophotography is the light pollution of the night sky. The light from ground-based sources scatters in the atmosphere and hits the camera lens, causing the image to light up. Light polluted sky is not dark and we can not see many dim night sky objects in it. The light pollution is the largest in big cities, and the smallest when you are far away from cities and other big sources of light. To do astrophotography in an urban area is still possible, however it requires additional efforts and equipment which may become a considerable obstacle for a beginner. In addition, in this case, it is possible to capture only the brightest objects of the night sky. You will get a much better image if you shoot the night sky where there is little light pollution. To find these locations you can use interactive light pollution map.
Star Trails Photography
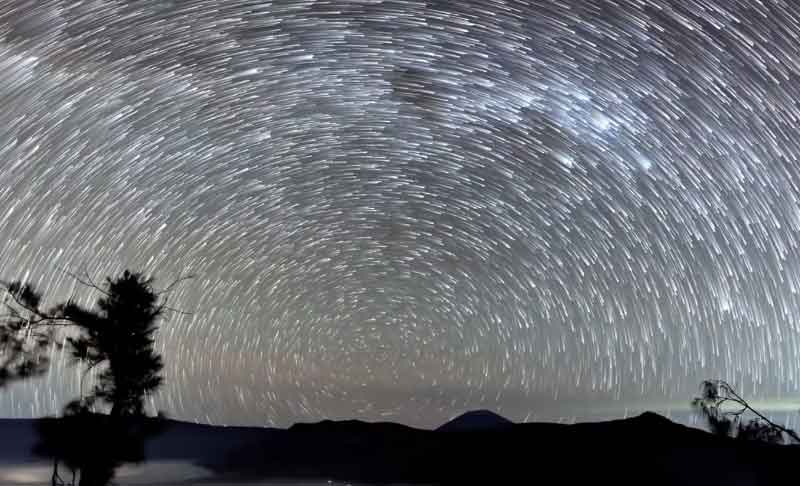
Another subarea of astrophotography is taking images of the night sky intentionally with star trails. This technique produces beautiful pictures where we see how the stars rotate. This can be achieved by fixing a photo camera on a tripod and using an exposure of several minutes or about an hour or even more. Another option is to take many images of short exposure and with equal small intervals between them and then to stack the images together with the help of special software like StarStaX and Startrails.
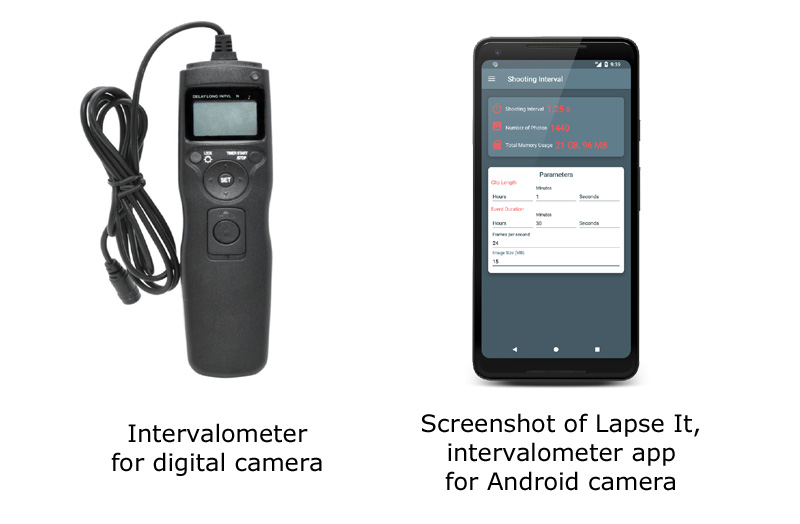
To take hundreds or even thousands of images with equal exposure of several seconds, astrophotographers usually use the intervalometer which periodically triggers exposures. Some professional photo cameras may have built-in function of intervalometer. The intervalometer is also available as a separate device which is attached to a camera. If you take photos using a smartphone then you can use special apps for time-lapse photography which have an intervalometer function. Another variant to automatically take many images with periodic intervals is to record a video of the night sky and then to extract frames from the video for stacking.
Image Processing
For image processing astrophotographers use special software for stacking a series of shoots and general purpose image editing programs like Photoshop and GIMP. If you already have experience of image enhancing in these editors, it will definitely help you in astrophotography. The task of this editing is to improve visual appeal of the image by filtering out light pollution and bringing the desired object out of the background. It is achieved by adjusting colors, reducing noise and increasing brightness and contrast.
Planetary Photography
An unaided eye sees the planets in the night sky as bright points, almost like stars. To take photos of the Moon and the planets with details on them, we need to magnify them. To magnify these distant objects, we should use a telescope. To shoot the Moon with the camera is still possible, however if you want to see detailed images of the Moon’s surface with craters and mountains then you need a telescope. Another advantage of using a telescope is its light-gathering power. A telescope objective gets more light than a camera lens, and it results in a brighter object image for the same exposure.
To make first steps in astrophotography any telescope is enough, so if you already have a telescope and use it for visual observations then you can attach a camera to it and start making photos. If you are going to get a telescope then you can take your time to choose a telescope suited for planetary astrophotography. Telescopes with larger focal length are better for planetary photography as they give larger magnification.
Standard technique of taking a photo of a planet is to make a series of exposures and then to stack them in special software like Autostakkert! or SIRIL to produce one image. Due to Earth’s rotation around its axis, the planets are moved in the night sky. Therefore, a telescope tube should be periodically turned to follow the planet during the shooting session to keep it in the field of view. There are two types of telescope mounts which allow rotation of the telescope tube: alt-azimuth mounts and equatorial mounts. Equatorial mounts are constructed especially for easy tracking of night sky objects and thus they are preferable both for planetary and deep sky astrophotography. There are advanced motorized and computerized telescope mounts which allow automatic tracking. However, taking photos of planets with alt-azimuth mount and with manual tracking is possible too, and may be enough for beginners.
There are several ways to attach a photo camera to a telescope. In planetary photography a camera usually is attached after an eyepiece to get a magnification which the telescope gives. If you have a modern camera with a removable lens then you can attach the camera without a lens. In this case the image after an eyepiece is projected directly to the camera image sensor. A camera is connected to a telescope using two additional accessories called camera adapter and T-ring. These accessories are specific to eyepiece diameter and camera model. A camera with a camera lens can also be attached to a telescope. In this case both telescope and camera should be focused at infinity.
Deep Sky Photography
Images by Bob Star
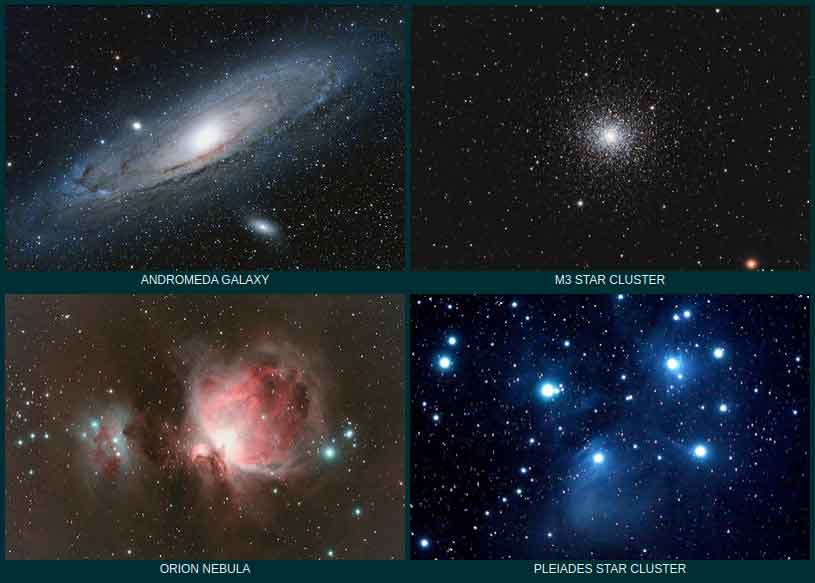
Deep sky photography is taking photos of space objects which are outside of the Solar system like galaxies, nebulae and star clusters. It is probably the most difficult type of astrophotography. Major challenge in taking photos of galaxies and nebulae is that they are faint. Ultra-long exposures or very long series of exposures are required to collect enough light from the target and to make the object visible by camera image sensor. This is the case where telescope aperture plays a very important role: larger objective diameter collects more light from a faint object. Usage of an equatorial mount and automated object tracking is also a big plus in deep sky photography. Another important telescope spec is focal ratio. Galaxies and nebulae are extended objects and to view them a wide field-of-view telescope with a small focal ratio of f/6 or less is preferred.
It is still possible to enter deep sky photography with beginner equipment. Using an inexpensive telescope and an average photo camera, you will be able to take photos of some bright deep sky objects like the Andromeda Galaxy and the Orion Nebula.